With so many features packed inside each Microsoft application, it’s easy to overlook some that can really add value to your daily workflow. Below is a list of some of the features you may have never noticed but will quickly become part of your daily routine.
Styles
Styles are not only a great time-saver, but they form the basis of a variety of other Word features.
Styles allow you to assign in bulk a variety of different formatting attributes, like font size, style, color, alignment, line spacing, borders, shades, indentation, etc… The list is quite voluminous. Once styles are applied to text, the text can then be bulk-updated simply by changing the style. If you modify the style, Word will automatically apply the change to all text whose appearance was created from the style. Imagine the time saved when making minor alterations like changing the font size of all headings. Change the style and all of the headings are updated to match.
Once you have your styles in place, you can now also navigate more effectively through your document via the Navigation Pane. Any text formatted with a heading style will appear as a list entry. This will become one of the greatest time-savers when navigating large documents.
Styles will also allow you to automatically generate Tables of Contents. Any headings formatted by virtue of styles will become Table of Contents entries. Think of how long it would take to create this table manually, much less update when parts of your document move around during editing. With the push of a button you can have an updated Table of Contents and know that you didn’t miss anything.
Quick Parts
Think of Quick Parts as document modules or on-demand mini templates; saved parts of a document that you reuse.

Imagine every time you wrote a memo you had to insert the same disclaimer at the end of the memo. Why not write the disclaimer once, save it to the Quick Parts Gallery, then insert with a click whenever needed. Once you’ve amassed a library of Quick Parts, building similar documents becomes lickety-split quick.
Navigation Pane
This one was mentioned in the Styles tip, but it stands alone as a great way to navigate through your document. Even if you’re not using Styles you can still navigate through a document quickly by viewing all of the pages in your document as thumbnail images.
The Navigation Pane can be launched by clicking on the View tab and clicking the Navigation Pane checkbox in the Show group.
After the Navigation Pane has been launched, click Pages towards the top to view your document as a series of thumbnail images.
Hidden Text
Imagine having a document that has two different version; one that contains the full text and one that omits certain portions of the text. Instead of trying to maintain two different versions of the document (think of the duplicated work when making updates), simply hide the portions that you don’t want seen for the abbreviated version.
To make text hidden, highlight the text you want to hide, enter the Font control dialog box and select Hidden.
The text will instantly disappear. You can still view the text by displaying the formatting controls (CTRL-*); this will allow edits to take place. If you need to print the hidden text, enter Print Preview, click the Page Setup button, select the Paper tab and click the Print Options… button. In the Printing Options section, check the box labeled Print hidden text.
Incidentally, all of those steps can be reduced to the push of a button of you record them as a macro and setup a launch button on your Quick Access Toolbar.
Open a Copy
How many times have you wanted to alter a document but not change the original version of the file? You could always navigate through the File Explorer to find the file and make a copy of it, or you could open the file and perform a Save As… and give the file a new name. But what happens if you forget and accidentally save over the original version.
The safest (and possibly the fastest) technique is to navigate to the file as if you were going to open it, but tell Word to open it as a copy.
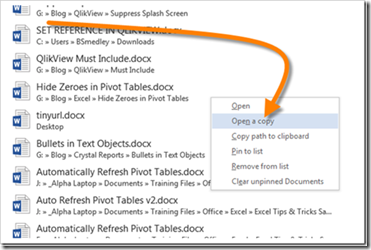
If you are using the Recent Documents list, right-click on the file entry and select Open a copy.
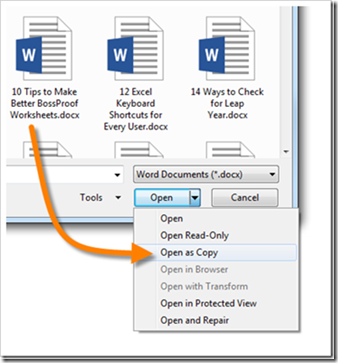
If you are using a traditional Open dialog box, select your file and then click the small down arrow to the right of the Open button. From the list, select Open as Copy.
Word will open the file as if it were a brand new document and force you to save it with a new name. This will help prevent accidental overwrites (and the utterance of many bad words that would upset your mother.)
Move to Where (F2)
Cut and Paste is sooooooooooo last century. Even with the CTRL-X / CTRL-V keyboard shortcuts, you still have to press four buttons. How about reducing the Cut and Paste operation to a single button? That’s where F2 comes to the challenge.
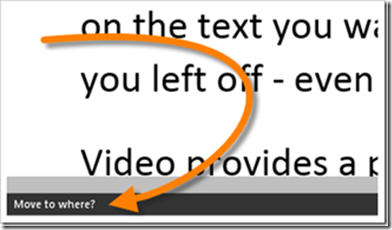
Highlight the text you want to move and press the F2 key on your keyboard. Notice at the bottom left corner of Word it says Move to where?
Place your cursor at the location where you wish to move your text and press ENTER.
DONE!
(I know; technically it was two buttons, F2 and ENTER, but it still kicks all other methods to the curb.)
Present Online
Have you ever wanted to review a document with someone but you aren’t allowed to send the file or you just don’t want to distribute a copy? You can show someone the file without ever sending it by presenting the document over the Internet in a virtual presentation.
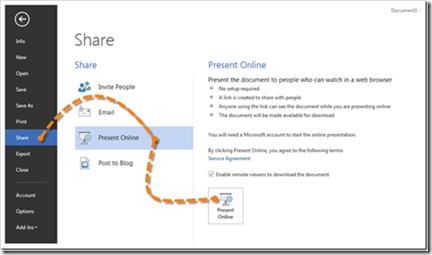
In the Backstage of Word, click the Share category and select Present Online.
The only requirement is that you have a Microsoft account (like a Hotmail or Outlook account) to use for authentication purposes. When you elect to Present Online you will be given a link that you can email or text to the viewers. When they click on the link, they will be joined to an online meeting where they can see the document you are presenting. There is no additional software that needs to be installed on any viewer’s computer. This allows you to get around those pesky corporate policies that prohibit the installation of software.
You can control the scrolling or the viewer can take control and scroll at their leisure without disrupting what other viewers see on their screens.
If you wish to allow the viewer to download a copy of the file, you can enable that feature when starting the meeting. By default, viewers can only view but not download.
Wikipedia Add-in
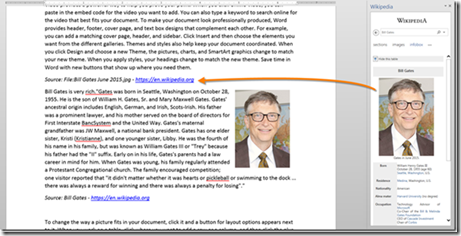
Wikipedia is a fantastic resource when researching information or gathering images for a document. By activating the Wikipedia Add-in (located on the INSERT tab in the Add-ins group) a task pane will appear on the right side of the Word program.
When you highlight text in your document, the Wikipedia Add-in will automatically search for relevant articles, references, and images. If you find something you can use in your document, highlight the text of interest and click a PLUS button; Wikipedia will automatically insert the text or image into your document and even include the appropriate source citation so you don’t get accused of plagiarism.
PDF Reflow
In the old days (remember two years ago?) when you would get a PDF and needed to turn it into a Word document or wanted to edit the PDF and generate a new PDF, you had to spend big $$$ to perform this reverse-conversion. Word now contains an ability called PDF Reflow (introduced in Word 2013) that will take an existing PDF and convert it to Word format.
All you have to do is open a PDF in Microsoft Word and PDF Reflow will convert the PDF to a Word compatible format.
Word will do its best to preserve the structure and features of the PDF (i.e. things that look like tables are converted to tables, headings and lists are preserved), but the execution is not always flawless. Embedded images don’t always show up in the exact same location, so you still should proof the result to see if there were any strange interpretations.
Spike
I saved the weirdest feature for last. The Spike is a feature in Word that is not advertised ANYWHERE!
Remember the old days where people used to place receipts on a metal spike, to hold them after they had been processed?
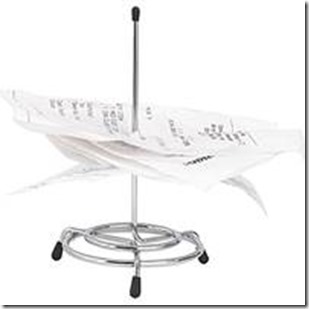
If you have several pieces of text in a Word document that are not in the correct order, instead of moving each piece separately, you highlight a piece of text and press CTRL-F3. This will cut the highlighted text out of your document and place the highlighted text into computer memory. The data is NOT going to the Clipboard; this is not a CTRL-X operation, this is sending the extracted data to a completely different place in memory.
Continue highlighting portions of text and pressing CTRL-F3. Make sure you highlight the text in the order you want it arranged in the final result, because just like a real spike, the order that the papers go on the Spike, they always come back off in the reverse order.
Once you have all of the pieces loaded on the Spike, click where you want the data to be deposited and type the word “spike”. After you type the word “spike”, a small preview will appear showing the first few sentences of the extracted data. When you press ENTER all of the collected data will be dumped from memory and placed in your document in the order that you “copied” it with the CTRL-F3 steps.
Go ahead, try it. It’s pretty cool.
Another way to unload the Spike is to press CTRL-SHIFT-F3.


